
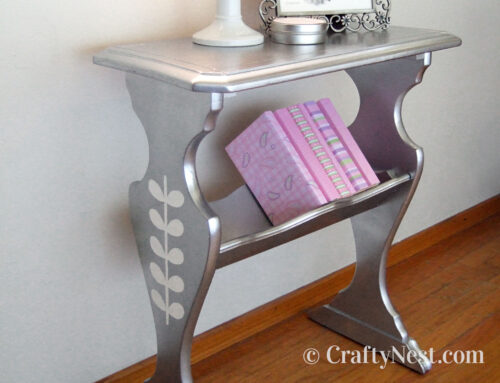
DIY project: adding bamboo veneer flowers to Ikea Lack tables

Last year I fell in love with Jason Horvath’s Sakura table from Uhuru (below). It was out of my price range, so I decided to make my own version using some bamboo veneer a friend gave me and two Ikea Lack tables I got on Craigslist. Aiming for an organic floral design, I used photos of gerber daisies and cosmos to create my patterns. Btw: This treatment would also look great on many other types of painted furniture. How about a 70s geometric pattern on a boring cabinet? P.S. Thanks for your patience and words of encouragement this week. It took me a while to scrape off the old glue and summon the will to try again. (This post contains affiliate links. If you use these links to buy something, I may earn a small commission. You can read my full disclosure here.)

I tried this method because I had the veneer on hand, and Ikea Lack tables are inexpensive. But there are many other ways you can achieve this look, some with a much easier process. You could buy a stained-wood table, cut vinyl flower patterns, adhere them to the table, paint the entire table, then peel off the vinyl. Or use bamboo-patterned vinyl, which is even easier, but not as long-lasting. It comes in all different types of wood, such as bamboo, oak, walnut, and pine.

How to make bamboo veneered side tables
SUPPLIES
TOOLS
DOWNLOADS
INSTRUCTIONS

1. First, find photos of flowers you want to use (or draw your own freehand). Click here to download the images I used.

2. Draw a rough sketch of your design.

3. Measure your tables and make sure your paper is going to be big enough for your design.

4. Clip a sheet of paper to the clipboard and lean it against the wall. Place your image under the projector and aim it at the clipboard. (You could tape the sheet of paper to the wall instead, but the clipboard provides a smoother surface for tracing.) Measure the projection and adjust the distance of the projector from the wall until you achieve the right size flower. This cosmo is 18 inches in diameter.

5. Trace the outline of the flower, then cut it out. I found using a utility knife to be faster than scissors. Use whatever tool you’re more comfortable with.

6. Tape the flower to the table to visualize your pattern and decide the size of your next flower.

7. Repeat steps 4 — 6 for each additional flower. Make sure the tables look good from every angle. (I decided against the small flower in the end.)

8. The veneer I used is from Moso Veneer Products. Call the phone number on their website to place an order. As of this writing, it’s $2 per square foot, sold in 4- by 8-foot sheets. That’s way too much for this project, but I can think of 101 uses for the leftovers. Can’t you? UPDATE: The Moso Veneer Products website is no longer active. Try this veneer from Amazon. Or for an easier and cheaper alternative, try bamboo-printed vinyl.

9. Draw a line in each flower where the edge of the table is. Line up this line with the grain of the veneer. Keep the veneer grain consistent throughout your project. Then tape each pattern to the veneer and trace it with a pencil.

10. Cut around the outside edge to create a smaller, less unwieldy piece to work with.

11. Cut it out the shape with kitchen shears (or other heavy-duty scissors). You may want to smooth out some of the sharp curves as you cut to make it easier to cut out.

12. Use a heavy-duty craft knife and a self-healing mat to cut out each center. This is the hardest part of the entire project.

13. Using a ruler, mark and trim off the pieces that will be adhered to the sides of the tables.

14. For the flower that crosses over the two tables, cut it in half along the edge. Then trace and cut a duplicate of each piece. These will be adhered to the sides of the tables.
15. Erase all the visible pencil marks, then lightly sand the jagged edges of every piece of veneer you’ve cut.

16. Using a ruler and pencil, mark and trim off excess pieces. If you have any pieces that extend from the side of the table to the leg, cut at the seam so the leg will still be removable.

17. Paint a thin coat of polyurethane on the top and sides of all the pieces. Let dry three hours. Lightly sand, then apply a second coat. Let dry overnight.

18. Apply a thin layer of glue on the back of one piece at a time. Cover the entire surface. Turn it over and place the piece on your table. Press down.

19. Stack a couple of heavy books on top until the glue cures. Tape the side pieces down with masking tape or painter’s tape.
20. Remove the tape and books a few hours later. The glue will fully cure in 48 to 72 hours.

Share this story
Reader Gallery
Made this project? Email your photo(s) to monica (at) craftynest (dot) com, and I’ll share your version here!


Leave A Comment