
Carving pumpkins with a drill

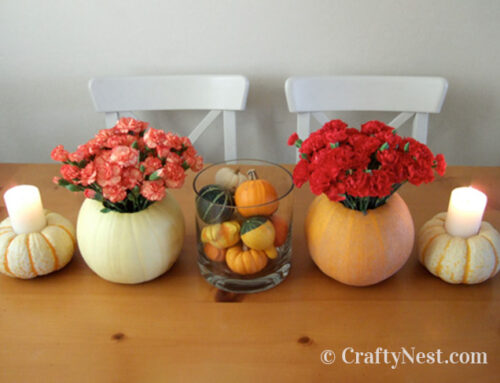
I’ve been dying to try drilling pumpkins for two years, and I finally did it. It’s fun, but after drilling three pumpkins, my hand got tired from holding the drill. But it was worth it. Those daisies are sitting in a jar full of water inside the pumpkin. How, then, did I light the pumpkin, you ask? Glow sticks. It worked, but it took lots of them to achieve the same brightness as one tealight. Battery-operated tealights might be a better solution. By the way, these would also make a great holiday centerpiece.
How to carve pumpkins with a drill
SUPPLIES
TOOLS
INSTRUCTIONS

1. Decide what pattern you want to drill into each pumpkin. You could use a marker to plan your pattern. Start drilling. For the small pumpkin, I used a 7/16 bit for the centers of the flowers, and a ¼ bit for the petals.

2. Use your fingernails to remove little flaps of pumpkin still attached. For the medium pumpkin, I used 7/16 and 3/16 bits. This was the easiest pattern to execute, because all you have to do is follow the ridges of the pumpkin.

3. Use painter’s tape as a guide for patterns that need straight lines. For this one, I used 7/16 and 3/16 bits.

4. After you’ve drilled all the patterns, clean off the loose pieces of pumpkin.

5. Carve the lids out and scoop out the insides. Run the drill bits through the holes again, if necessary, to clear out pumpkin debris.

6. For the pumpkin with flowers in the top, place a jar of water inside the pumpkin. Replace the lid.

7. Drill holes in the lid for each blossom. Make sure they are angled toward the water jar. Cut all your stems the same length and strip off the leaves.

8. Insert a flower in each hole, making sure the stem is sitting in the water.

9. Light your pumpkins. I used votives in the two smaller pumpkins, and about six glow sticks in the one with the flowers. Six lightsticks weren’t as bright as a single votive (orange or green are brighter than white), so I would recommend drilling a more intricate pattern to let out more light. If you use a votive, I suggest removing the lids — unless you want charred pumpkins.

Share this story
Reader Gallery
Made this project? Email your photo(s) to monica (at) craftynest (dot) com, and I’ll share your version here!


An you do this with the faux pumpkins from Michael’s