
Sylvania DIY room-makeover challenge: the after

This is the first whole-room makeover I have attempted on Crafty Nest. What an undertaking! I had been planning to make over my office/guest/craft room for some time. The makeover involved a ton of DIY — which is definitely why I had procrastinated the job. Then Sylvania invited me to participate in their blogger room makeover challenge — just the impetus I needed to get started. They sent me a $500 gift card to Lowe’s, a bunch of Sylvania’s new LED light bulbs and light fixtures, and gave me a weekend to get the job done. (This post contains affiliate links. If you use these links to buy something, I may earn a small commission. You can read my full disclosure here.)
At the start, I knew I needed to call in a reinforcement: my younger brother, Troy, who blogs about his amazing construction and finish work at Hardhat13. And it was a good thing I did. At the end of day two, we realized we were only halfway done. So, this is technically a two-person, two-weekend job.
Check out all the Sylvania blogger room makeovers over the coming weeks on their Facebook page. If you “like” the page, you can enter the daily sweeps to win your own Sylvania lighting products and Lowe’s gift cards so you can perform you own room makeover!
Here’s the “before” video. Let’s all make fun of how many times I say “love it.” One thing I do not love is making videos. My videos are unedited, so kindly forgive my rookie mistakes. And apologies if you get seasick watching it.
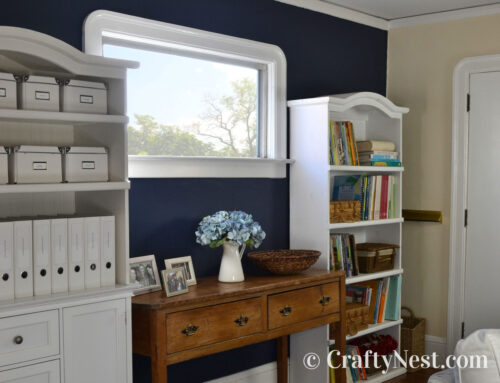
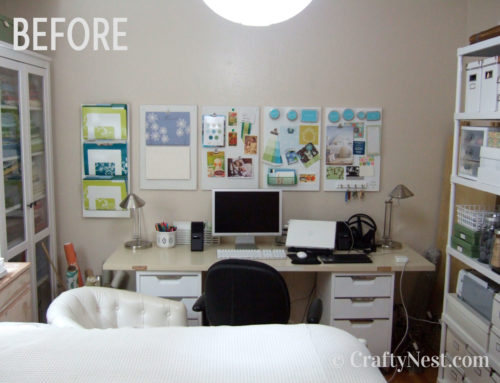
It’s hard to believe that I stuffed so much furniture in that one little room, isn’t it? Amazingly, though, there is more furniture in the room after the makeover than before, yet everyone tells me the room looks bigger now. Mission accomplished.
The look I was going for is beach cottage meets industrial chic. The colors: blues, greens, whites, and silver — all cool, calming colors of the sea. I infused liberal doses of galvanized steel, paint, lighting, white fabric, and tassels. Now the room is serene, less cluttered, and practical.

I designed the studded mirror to echo the look of my riveted steel magnet board. It’s made from 12-inch mirror tiles. The mirror adds more light to the room and makes the potted plants look even more plentiful. Click here for the mirror tutorial.
The pom-pom paper lantern you’ve seen before on Crafty Nest. The white twill curtain panels and the plush Wooly Bully accent rug are from Lowe’s. I made the tassels from yarn I had on hand. To make the curtain panels, all I did was rip the seams to detach the tabs on tab-top curtains, fold them over so the loop is much shorter, sew them in place, and stitch a tassel on each dangling tab.
Here’s the “after” video. As I mention in the video, the room is now organized into three zones: the craft zone, the office zone, and the guest bedroom zone. Surprisingly, Troy is more versed in feng shui than I am. He informed me that the energy in this room was all wrong. Moving the fabric cabinet to the other side of the room made a world of difference.


When the wind catches those white curtain panels, I’m reminded of the billowing white curtains in The Great Gatsby. (I can’t help it. I read that book three times for a paper in college.) Those blue Bombay Sapphire gin bottles were plucked out of my apartment complex’s recycle bin.
That bed frame is the bottom half of a bunk bed that I got on Freecycle. It needed repairs, a new paint job, and new drawer pulls, but it offered ample storage underneath, which is what I needed most. I made the repairs, painted the bed with Rust-Oleum “Heirloom White” spray paint, and replaced the drawer pulls with some brass ones from a salvage yard that I painted with Rust-Oleum chrome spray paint.


One of my favorite items in the makeover is this tall table that rolls over the bed. I had been wanting an over-the-bed table for more than a year. When I found two sets of galvanized steel pipe table legs with casters on Craigslist, my dream became a reality. One set of legs went on this table, and the other set went on my desk. The seller said he bought them at Discount Builders Supply, but I haven’t confirmed that.
The roll of paper is mounted to the table with two brushed nickel curtain brackets and an old broom stick painted the same color as the bed. You could also use a 1-inch dowel. The table top and drawing paper roll are from Ikea (each found for less than half price on Craigslist). On the other side of the table, I mounted an Interdesign swivel paper towel holder.
The table is the ideal height for standing, which is great for my back. It’s also the perfect height for sitting with a laptop (or breakfast!) in bed. And it can roll to anywhere in the room. Now I can do all my crafting in my craft room instead of schlepping all my supplies to the dining table. Woohoo!
In this video, I talk about Sylvania’s fabulous LED lighting in my craft room. All the lamps have Sylvania’s Utra LED Dimmable 12W Aline light bulbs in them. They use 80 percent less energy and last 25 times longer than than a 60W incandescent bulb. I can have all five lamps on at once (the equivalent of 300W) and use only 60W. The room is so much brighter — not to mention energy-efficient — now.
These LED light bulbs are also mercury-free, lead-free, and dimmable, so I installed a dimmer switch that is specifically designed for dimmable LED and CFL light bulbs. It dims the overhead light beautifully.
In addition to the LED light bulbs, I also used some of Sylvania’s amazing LED light fixtures. In the closet, I used a DOT-it Linear Swivel. Under a shelf, I used an LED Light Flute. And I plugged a Power Failure Light in the power strip mounted on my rolling toolbox.


At first glance, this crafting wall rack doesn’t look much different from the first time you saw it on Crafty Nest. But if you look closely, you’ll notice it got a fresh coat of paint (Rust-Oleum “Heirloom White” spray paint), a shelf, a new light fixture, and storage for more ribbon and duct tape.

I upgraded the original dowels (which tended to sag) with Irja curtain rod sets ($2 each!) from Ikea. All I had to do was cut the curtain rods down with a hack saw and mount the brackets on the rack.


The office zone is so much more Zen than it was before. The cord control problem was solved with a new home-entertainment surge protector, some mounting cable ties, and some Velcro cable straps
. Plus the cords feed through a white 2-inch computer grommet.
The desk top is actually a hollow-core door that I bought at a salvage yard for $10. The 80-inch door was too long, so Troy cut it down to 72 inches. He then painted it with Valspar semi-gloss paint in “Dogwood Petal” (CI 203). It’s a beautiful soft white that’s a close match to Rust-Oleum’s “Heirloom White” spray paint,
which I used on the bed and wall rack.
Although I loved my Space Traveler halogen desk lamps (partly because they’re the exact lamps used on Stargate. Yes, I’m a sci-fi geek), I replaced them with the more versatile blue glass lamp bases from Lowe’s
. The lamp shades are from Lamps Plus
and 8-inch nickel-plated harps and finals
finished them off.

Now for the centerpiece of the room: the magnet board. It was inspired by Restoration Hardware’s Aviator Collection. As you may already know, I’m kind of a World War II airplane buff. I love WWII airplanes — especially P-38s and B-17s. Anyway, Restoration Hardware’s Aviator furniture is based on WWII airplanes. Everything is clad in metal, leather, and hundreds of rivets — just like classic airplanes. I especially love their Aviator Wing Desk and Spitfire Chair. Drool.
So, I designed my magnet board to look like a WWII airplane too. It’s made from three pieces of sheet metal riveted to a sheet of plywood. It required 102 holes to be drilled in the metal and 102 rivets to be driven through the holes. Not a fast or easy task. Click here for the magnet board tutorial.

I coveted this aluminum wall clock for more than a year. It has the perfect hands, and it’s completely silent. Best clock I’ve ever owned. I painted that Crafty Nest sign before I redesigned the website three years ago. I never knew what to do with it. Hanging at the center of my magnet board seemed the perfect place.


I collected random tins over the years for storing office supplies such as postage stamps, rubber bands, and paper clips. I designed my own labels, printed them on Avery full sheet labels (#5265), cut them out, and adhered them to the tins. Then I inserted a few Mighty Magnets in each tin and stuck them on the magnet board.


Now is as good a time as any to talk about the paint color. The color I chose was Martha Stewart’s “Enamelware” (MSL116). But Lowe’s doesn’t carry Martha Stewart paint, so I asked them to match the swatch. I bought a gallon of Olympic Premium Interior Satin Base Paint, and they matched the color perfectly. Because Olympic is a low-odor, zero-VOC paint, Troy was able to sleep in the freshly painted room that very night. He said it smelled like peanut butter. Click here for Troy’s painting tips.
The two over-the-door hooks used as valet hooks on the closet doors added some more usable space to the room. While over-the-door hooks can sometimes inhibit an actual door from closing, they don’t interfere with the normal function of a rolling closet door. Just make sure you mount them only on the outer door.

The floral art is actually two pieces of scrap fabric I picked up from Fabmo. I framed them in some old green picture frames that I painted with Rust-Oleum’s “Heirloom White” spray paint.


I made a cover for my InterMetro office shelving unit out of four white tab-top curtain panels. The tabs, together with my homemade yarn tassels, adorn the new valance.

The two front panels attach with Velcro that is hiding underneath the valance. When closed, the cover decreases the visual clutter in the room, creating a more serene office space.

When the cover is open, the front panels can be tucked behind, and the tabs and tassels can easily flip up and out of the way. The large galvanized steel bins on the top shelf are from Lowe’s. I attached felt pads to the bottom of the bins to prevent them from scratching the shelves. The clear plastic tool box is from The Container Store. The plastic countertop drawer unit is from Target. And the white storage boxes are from Ikea.


I swapped out the old twin-size duvet for a full/queen size comforter that covers the tall mattress and box spring nicely. The gorgeous green Falling Floral duvet cover is from Urban Outfitters. The crochet pillow shams were a gift from a friend. The feather/down pillows from Fabric.com are covered in fabric I had on hand. I followed my own pillow cover tutorial to make them.
I made the throw blanket and matching pillow (on the white leather chair) from the duvet and pillow shams in the before picture. All I added was some white satin blanket binding, and the dowdy duvet was transformed into a luxurious blanket.

I decided that the large lamp that was on the nightstand before was just too big for the space. It blocked the view—both inside and outside the room. I replaced it with an Acrylic Stack Ball Lamp Base from Lowe’s, which is unobtrusive and lets light pass right through it. Perfect for in front of a window. The lampshade is from Lamps Plus, and the required 9-inch nickel-plated harp and finial are from eBay.
I painted the nightstand in Martha Stewart’s “Chinchilla” (MSL264). Again, Lowe’s matched the color, this time in Valspar semi-gloss paint. I finished it off with Rill casters from Ikea and ceramic drawer knobs from a salvage yard. The galvanized planters are also from Ikea, and the moss is left over from my cupcake moss centerpieces.


This cluttered corner got a breath of fresh air thanks to the new paint color, my “Step Up the Fancy” poster, and the sleeker lime file folders. The white 20-liter step trash can was a $10 thrift store find.

Taken from Crafty Nest’s former tag line, “Step up the fancy for less,” and inspired by the ubiquitous “Keep Calm and Carry On” posters, I designed this “Step Up the Fancy” poster. It’s silk-screened in bright peacock blue on recycled 100 lb. matte heavyweight cover stock. Soon you can buy the poster at my Etsy shop.
That’s it for the makeover. Please check back in the coming weeks for each tutorial. Thank you, Sylvania, for sponsoring my office/guest/craft room makeover. It wouldn’t have turned out this well without you and your fab LED lights. Tomorrow I’ll post my top 5 home decor and lighting tips regarding this room.
This post is sponsored by Sylvania. I received monetary compensation for my participation, but my review and opinions are my own.

Share this story
Reader Gallery
Made this project? Email your photo(s) to monica (at) craftynest (dot) com, and I’ll share your version here!
Can you please give details on how you made the white cover for the shelf out of curtains?
Hi Eliza. I’ll try. I made it so long ago that I can’t remember exactly how I did it, but I do have my step-by-step photos to refer to. I’ll work on that post soon and email you when it’s done. Thanks for visiting!
I would like to see the directions to create the valance and how to attach it to the plastic shelving. I would love to recreate this look for my master bathroom as I don’t have a linen closet.
WHAT DO YOU DO WITH THE ROLLING TABLE WHEN YOU HAVE GUESTS?
Hi Diane. Good question. First, I built the table tall enough that your legs can fit under the table when lying on the bed. And second, the table is only 24 inches wide. So my guests could either leave it at the end of the bed or push it beyond the foot of the bed when they go to sleep at night. Thanks for visiting!
Love this! You packed a lot in a small room! I have tons of fabric and craft supplies, thought I was going to have to get rid of but after seeing this makeover I am going to do it. Can’t tell you how long I’ve been looking for something like this, just what I needed and want. Only question I have is what size room is this? And the walls are blue not green right?
Hi Suzy. I think the room was 10 x 11 feet. So small, right? The walls were a blue-green. I used Martha Stewart’s Enamelware (MSL116), which is no longer sold in stores. I’d love to see pictures of your craft space when you’re done! Thanks for visiting!