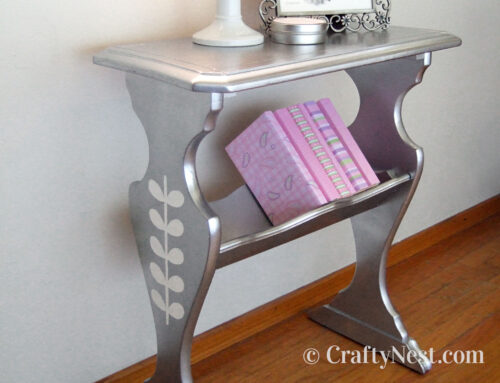
Plant stand + Lazy Susan = DIY mini side table
![hero-plant-stand-lazy-susan-mini-side-table-crafty-nest Side table made from a plant stand and Lazy Susan, photo](https://i0.wp.com/www.craftynest.com/wp-content/uploads/2020/11/hero-plant-stand-lazy-susan-mini-side-table-crafty-nest-scaled.jpg?resize=1200%2C1600&ssl=1)
I decided to try a different take on the tray table I made nearly a year ago. This time, it would have a more practical permanent top. Plus, it’s an ideal opportunity to use more of my furniture nails, which I love, and some fabulous lime green spray paint. I’m volunteering at a girl’s camp next week, so I’ll post my next project in two weeks. Hope you’re all enjoying your summer! (This post contains affiliate links. If you use these links to buy something, I may earn a small commission. You can read my full disclosure here.)
![before-plant-stand-tray-table-crafty-nest Rusty old metal plant stand, photo](https://i0.wp.com/www.craftynest.com/wp-content/uploads/2008/08/before-plant-stand-tray-table-crafty-nest-scaled.jpg?resize=1200%2C1600&ssl=1)
How to turn a plant stand into a mini side table
SUPPLIES
TOOLS
INSTRUCTIONS
![DSCF4457-plant-stand-lazy-susan-mini-side-table-crafty-nest Trace the Lazy Susan, photo](https://i0.wp.com/www.craftynest.com/wp-content/uploads/2020/11/DSCF4457-plant-stand-lazy-susan-mini-side-table-crafty-nest.jpg?resize=500%2C375&ssl=1)
1. To make a guide for evenly spacing out the furniture nails, trace the top of the Lazy Susan onto a piece of paper. Cut out the circle.
![DSCF4459-plant-stand-lazy-susan-mini-side-table-crafty-nest Mark 12 points along the circle, photo](https://i0.wp.com/www.craftynest.com/wp-content/uploads/2020/11/DSCF4459-plant-stand-lazy-susan-mini-side-table-crafty-nest.jpg?resize=500%2C375&ssl=1)
2. Here’s a no-measuring method to divide the circle into 12 equal pie pieces: Fold in half, then in half again the opposite direction. Then fold the outside edges into the center to create a square. Then fold the circle in half at each of the points where the square folds reach the edge. I’ve marked the lines so you can clearly see the folds. This gives you twelve points along the outside edge of your tabletop.
![DSCF4466-plant-stand-lazy-susan-mini-side-table-crafty-nest Spray paint the Lazy Susan, photo](https://i0.wp.com/www.craftynest.com/wp-content/uploads/2020/11/DSCF4466-plant-stand-lazy-susan-mini-side-table-crafty-nest.jpg?resize=500%2C375&ssl=1)
3. Spray paint the top of the Lazy Susan. Leave the base on so you can spin it while painting. If you don’t use a primer first, you’ll need to spray several coats (like I did). Let dry several hours.
![DSCF4463-plant-stand-lazy-susan-mini-side-table-crafty-nest Remove the nut, photo](https://i0.wp.com/www.craftynest.com/wp-content/uploads/2020/11/DSCF4463-plant-stand-lazy-susan-mini-side-table-crafty-nest.jpg?resize=500%2C375&ssl=1)
4. Flip the Lazy Susan over. Use pliers to unscrew the nut. Then pull the base straight up and off.
![DSCF4464-plant-stand-lazy-susan-mini-side-table-crafty-nest Remove four screws, photo](https://i0.wp.com/www.craftynest.com/wp-content/uploads/2020/11/DSCF4464-plant-stand-lazy-susan-mini-side-table-crafty-nest.jpg?resize=500%2C375&ssl=1)
5. Remove the four screws holding the turning mechanism. And, for goodness sake, remove the Ikea sticker. :-)
![DSCF4469-plant-stand-lazy-susan-mini-side-table-crafty-nest Place pattern on Lazy Susan, photo](https://i0.wp.com/www.craftynest.com/wp-content/uploads/2020/11/DSCF4469-plant-stand-lazy-susan-mini-side-table-crafty-nest.jpg?resize=500%2C375&ssl=1)
6. Place your pattern on your table top. Measure about half an inch from the edge, and drill a pilot hole at each point. The wood is hard and the nails are soft, so a pilot hole helps them go in straight. It’s OK if you accidentally drill all the way through on these. Then hammer a large furniture nail into each hole — but not all the way.
![DSCF4471-plant-stand-lazy-susan-mini-side-table-crafty-nest Peel pattern off, photo](https://i0.wp.com/www.craftynest.com/wp-content/uploads/2020/11/DSCF4471-plant-stand-lazy-susan-mini-side-table-crafty-nest.jpg?resize=500%2C375&ssl=1)
7. Tear the pattern away while leaving the furniture nails in place.
![DSCF4473-plant-stand-lazy-susan-mini-side-table-crafty-nest Hammer the nails the rest of the way, photo](https://i0.wp.com/www.craftynest.com/wp-content/uploads/2020/11/DSCF4473-plant-stand-lazy-susan-mini-side-table-crafty-nest.jpg?resize=500%2C375&ssl=1)
8. Hammer the large nails in the rest of the way. Place three small furniture nails between each large nail. Drill pilot holes for the small nails as well. Make sure you only drill down halfway for these. Insert them into the holes, then hammer them in the rest of the way.
![DSCF4474-plant-stand-lazy-susan-mini-side-table-crafty-nest Attach plant stand to Lazy Susan, photo](https://i0.wp.com/www.craftynest.com/wp-content/uploads/2020/11/DSCF4474-plant-stand-lazy-susan-mini-side-table-crafty-nest.jpg?resize=500%2C375&ssl=1)
9. Flip the table top over, and center the plant stand in the middle. Place the mending plates over each arm, drill pilot holes, then screw in all the screws halfway. Finally, tighten all the screws down snug against the arms of the plant stand.
![hero-plant-stand-lazy-susan-mini-side-table-crafty-nest Side table made from a plant stand and Lazy Susan, photo](https://i0.wp.com/www.craftynest.com/wp-content/uploads/2020/11/hero-plant-stand-lazy-susan-mini-side-table-crafty-nest-scaled.jpg?resize=1200%2C1600&ssl=1)
10. Flip it over, grab a cold drink, and have a seat. :-)
![pinterest-plant-stand-lazy-susan-mini-side-table-crafty-nest Crafty Nest plant stand Lazy Susan side table Pinterest image](https://i0.wp.com/www.craftynest.com/wp-content/uploads/2020/11/pinterest-plant-stand-lazy-susan-mini-side-table-crafty-nest.jpg?resize=600%2C900&ssl=1)
Share this story
Reader Gallery
Made this project? Email your photo(s) to monica (at) craftynest (dot) com, and I’ll share your version here!
Leave A Comment