
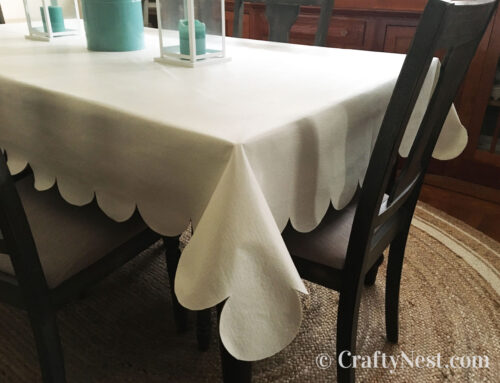
DIY mitered-corner cloth napkins

When I needed cloth napkins for my Easter table setting, I couldn’t find any that looked good with the color palette. But I had the ideal fabric on hand. So I examined the perfectly mitered corners on my Williams-Sonoma napkins and figured out how to miter the corners on my own DIY cloth napkins. After one minor misstep that involved repairing with an iron-on patch (oops!), they turned out better than expected.
Once you figure out the first one, the rest are a breeze. Click here to learn how to make the napkin rings. By the way, handmade cloth napkins make a great Mother’s Day gift.

When making napkins, choose a soft, lightweight 100-percent-cotton fabric. Personally, I hate it when you dab your mouth with a cloth napkin and it feels rough. Most cheap, poly-blend, store-bought napkins are too rough for my taste.
How to sew cloth napkins with mitered corners
SUPPLIES
TOOLS
INSTRUCTIONS

1. Prewash and iron your fabric. Cut fabric into a square 1 inch larger than your desired finished size. The standard size for cloth napkins is 20 inches square, but there’s room for variation. After prewashing, my fabric was 40 inches wide, so I cut 20-inch squares, which made 19-inch napkins.
Tip: With napkins, it’s important to start with square, straight edges. So use a rotary cutter, ruler, and cutting mat when cutting your fabric.

2. Using a sewing gauge, measure and fold all the edges over half an inch and iron. Then fold them another half inch and iron. Unfold each corner and diagonally snip off the outer half of the square formed by your outer folds. I marked the folds in the above photo so you can see clearly where to cut. Repeat for all four corners.

3. Fold each corner over at a 45-degree angle at the intersection of your inner folds. Press flat.

4. Here’s what it looks like after you make the fold and press it flat. Repeat for all four corners.

5. This step is a little more difficult to wrap your head around, but stick with me. Unfold the corner. Then fold the entire square of fabric in half diagonally, wrong side out. Sew along the line of the fold you made in step #4, starting at the folded edge and ending at the first fold mark you made in step #3. I marked the seam in purple in the photo above. Repeat for all four corners.

6. Turn that seam right side out. Poke a toothpick or chopstick into the inside to make each corner sharper. Also make sure the fabric underneath the seam spreads apart and lies flat. Press with an iron. Repeat for all four corners.

7. Tuck and fold all the edges under ½ an inch. Press flat.

8. Sew along the inside of your folded edges. For clean-sewn corners: Stop sewing when you reach each corner, put the needle down, lift the presser foot, turn the fabric 90 degrees, lower the presser foot, and keep sewing. Repeat for all four corners. Your first napkin is done! You got it now, right? On to the next one.

Share this story
Reader Gallery
Made this project? Email your photo(s) to monica (at) craftynest (dot) com, and I’ll share your version here!

Leave A Comment