
Outdoor bistro table & café chairs DIY makeover

I picked up this table curbside last year. The wooden top was weathered, cracked, and warped, and the base was rusted but sturdy. Then I found these French café chairs at Ikea, a replacement tabletop at The Home Depot, and exterior paint on Freecycle.
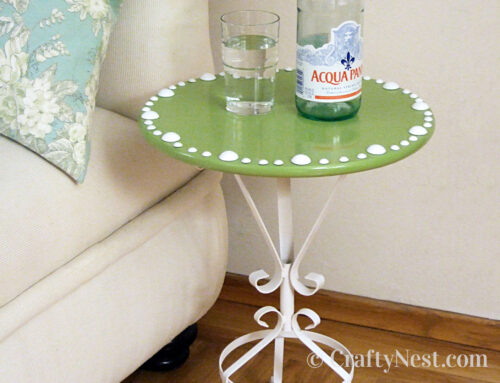
I decided to paint the set to match — but not just any paint job. The secret to painting this faux-mosaic table top? Dot stickers. Plus some white paint followed by a few coats of French blue paint. FIY: The oil-based paint took forever to dry, but it was worth the wait.

Add matching French bistro chairs (don’t you just adore the chairs below?), and you’re ready for an al fresco dinner. But not just any dinner. Snag a copy of Julia Child’s cookbook and whip up a tasty French recipe for you and your honey. (If you haven’t seen Julie & Julia yet, go see it now!) Bon appétit.

Jess Chamberlain, from Sunset magazine, took these photos of café chairs in coffee shops and gardens in Paris, Nantes, Bordeaux, and Toulouse.
How to revamp this outdoor table and café chairs
SUPPLIES
TOOLS
INSTRUCTIONS

1. First find an outdoor table to paint, then either paint some café chairs to match OR find café chairs in your favorite color and paint the table to match. (This tutorial assumes you went with the first option. I replaced the tabletop altogether with a 36-inch round laminated-pine tabletop from The Home Depot.)
2. Remove the wooden slats from the café chairs with a screwdriver. Remove and discard the old tabletop from the base. Lightly sand both the wooden slats and the new tabletop and remove the dust with a tack cloth.

3. Cover your work surface with a drop cloth. Paint one coat of primer on each side of the chair slats and tabletop. Let dry. Then paint 2-3 coats of blue paint on all sides of the chair slats and 2-3 coats of white paint on the top side of the tabletop. If you use the same paint I did, let dry 24 hours after each coat. Seems like a long time, but I found it necessary. Alternatively, you can use a water-based exterior paint, which will dry quicker.

4. Reattach the wooden slats to the chairs with a screwdriver.

5. Create your desired pattern by adhering dot stickers to the tabletop. Use a yard stick to make sure your pattern is symmetrical. If you need to move a sticker, lift a corner with the tip of your craft knife and discard the sticker. Do not reuse stickers. They don’t stick as well the second time.

6. Make sure all the stickers are adhering well, then paint one coat of clear medium over all of them. This step is important. If you don’t use the medium, the paint will bleed under the stickers. I know from experience. Let dry. Then paint 2-3 coats of blue paint over the entire top surface. Again, let dry 24 hours after each coat.

7. Peel off all the dot stickers. Use your craft knife to lift an edge, then peel off. You may need to remove some adhesive residue with a cleaner such as Goo Gone.

8. Paint 2-3 coats of blue on the bottom of the tabletop. Let dry after each coat. This will protect the wood from the weather on all sides.

9. It turned out that my table base wasn’t rusty, just the hardware was, so I replaced all the bolts and screws. A fresh coat of glossy black indoor/outdoor spray paint (along with new hardware) made the base look good as new.

10. Reassemble the base and place it on the bottom surface of the tabletop. Make sure it’s centered, then mark where the holes should be drilled. Set the legs aside and drill the holes. Make a little flag with painter’s tape on the drill bit marking how deep you should go. This will keep you from accidentally drilling all the way through the tabletop.

11. Drive wood screws into the pre-drilled holes to attach the base to the tabletop.

12. Take the bistro set to your favorite spot outdoors and enjoy!

Share this story
Reader Gallery
Made this project? Email your photo(s) to monica (at) craftynest (dot) com, and I’ll share your version here!


Leave A Comment