
DIY tulle tutu pendant lamp

Ever since I spotted Swedish designer Jonas Bohlin’s tulle lamp in Gudrun Sjödén’s catalog last year (below), I’ve been dying to make my own. I finally did it! I started with Ikea’s Melodi pendant lamp, then added tulle. Never having attempted anything like this before, I guessed four yards of tulle would be plenty. Boy, was I wrong. It actually took 10 yards. No worries, though. At $1 a yard at Walmart, the tulle is quite affordable. This lamp reminds me of a ballerina’s tutu. Imagine a pink one hanging in your little girl’s room. Or a black one in your modern bedroom. Jonas Bohlin’s lamp = $524. My lamp = $25. Woot. (This post contains affiliate links. If you use these links to buy something, I may earn a small commission. You can read my full disclosure here.)

How to make a tulle tutu pendant lamp
SUPPLIES
TOOLS
INSTRUCTIONS

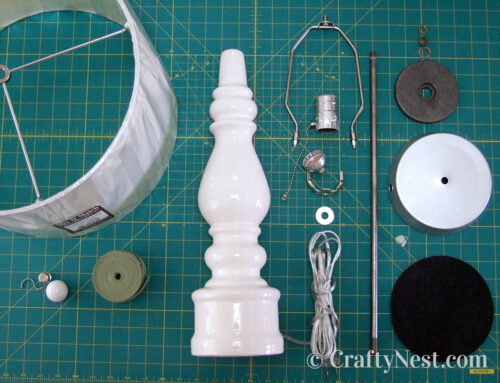
1. Gather your supplies. (You can ignore the fancy beaded trim in this photo. It was superfluous in the end.)

2. Using your rotary cutter and mat, cut a 17-inch-wide strip of tulle lengthwise. The mat makes this easy because the tulle is see-through. You might not even need a straight edge.

3. Fold the larger piece (37 inches wide) so that one side of the fold is 17 inches and the other is 20 inches. Lay the 17-inch-wide piece on top of the larger piece (17-inch fold facing up). Essentially, this creates three layers: two 17-inches wide and one 20-inches wide. Safety pin all three layers together half an inch from the edge of the fold and spaced every foot or so.

4. Using your mat as a guide, sew a simple running/basting stitch one inch from the edge of the fold. Start sewing about 1½ inches from the end. Space the stitches about ¼ inch. Clamp your spool of embroidery floss at the end to anchor it and allow for adjustments in length later on. You can baste by machine instead, but I sewed it by hand (because my sewing machine and I are are sworn enemies at the moment), and it went surprisingly fast.

5. Remove the safety pins and gather as you go.

6. When you get to the end, overlap the right and left sides 1 to 1½ inches and safety pin in place.

7. Continue stitching until you reach the other end of the floss. Remove the needle and trim your thread on both sides so you have plenty of extra to tie a knot.

8. Wrap the tulle skirt you created around the lamp, pull tight, and tie a knot.

9. Insert the cord kit and light bulb.

10. Hang it from the ceiling with a swag hook. Smooth and straighten the tulle.

Share this story
Reader Gallery
Made this project? Email your photo(s) to monica (at) craftynest (dot) com, and I’ll share your version here!
Leave A Comment