

I’m happy to report that most of the work is done on my dining room makeover that American Express generously sponsored. Unfortunately, however, I ran into a few snags. The dishes I ordered using my Membership Rewards points arrived broken, and other items were backordered. The replacements are due to arrive when I’m away at girls camp. So, my big dining room reveal is postponed until June 20.
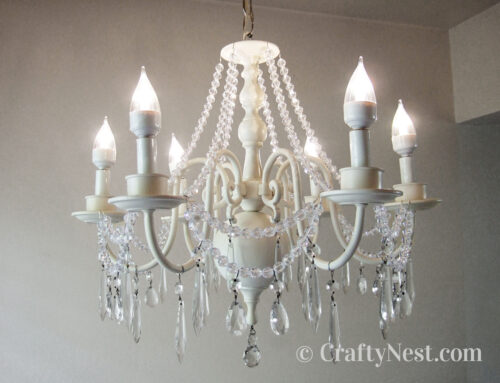
Until then, I wanted to give you a peak at one part of the room: my sparkly chandelier. I bought this old chandelier years ago for $20 at a salvage yard in Berkeley. I cleaned it up, and my brother rewired it. I’ve never been a fan of brass, so it got a fresh coat of paint.
Then I strung some faceted acrylic beads from the BeautyShells shop on eBay
and hung crystals that I scored on Craigslist and Freecycle. The chandelier has 73 crystals and 300 “crystal” beads. Now it brings “Little Girls” from Annie to mind because it looks like it’s “drippin’ with diamonds.”
The final touch was SYLVANIA’s decorative LED candelabra light bulbs. They’re gorgeous, and each light bulb uses only 2 watts, meaning the whole chandelier uses 12 watts! And they generate the perfect amount of light for romantic dinners—bright enough to see each other, yet soft enough to complement a few drippy candles.
I’ll show you how I did it all when I get back from camp. Remember, anyone who comments on any of these dining room makeover posts is eligible to win a $100 Home Depot gift card courtesy of American Express. (If you leave a comment while I’m away at camp, it will be approved when I get back.) Enjoy your week!
UPDATE 8/2012: I finally posted the tutorial! You’ll find it here.
RSS feed for comments on this post · TrackBack URL
June 8, 2011 at 5:25 pm
Your chandelier turned out just beautiful, Monica! I love it white and with all the crystals and beaded garland!
June 8, 2011 at 5:44 pm
wow! i love the chandelier re-do! i want to try something like this myself very soon…can’t wait for the reveal:)
June 8, 2011 at 6:18 pm
Great chandelier! refurbishing older items is always much more rewarding than buying all new things!!
June 8, 2011 at 7:52 pm
Wow..what an incredible makeover! Can’t WAIT to see the reveal! I need to get those LED bulbs too. Hey maybe I will win the Home Depot card then I can buy me some!
June 8, 2011 at 8:48 pm
Love this!! It’s de-LIGHT-ful :)
June 8, 2011 at 9:17 pm
I love the chandelier and I’m really excited to see the rest of the dining room makeover! If it’s as great as your craft/guest room was, then it will be worth the wait.
June 8, 2011 at 9:19 pm
LOVE this….beautiful!!! Hope to find one and do the same one day….thanks so much!!
June 9, 2011 at 3:13 am
Funny, because I’m normally a fan of brass and not white, but I really love what you did with this chandelier – gave it a really fresh, sparkly look to it!
June 9, 2011 at 3:30 am
LOVE it! Well done, Monica. Those bulbs are awesome, too. We have a chandelier in the garage waiting for a similar makeover, but I’ve been wondering what to do about bulbs — now I know. Can’t wait to see the big reveal (although I’m looking forward to the camp posts)!
June 9, 2011 at 4:08 am
The transformation is wonderful, I’m a big fan of chandeliers, especially ‘drippy’ ones and will have my own hanging transformation in the near future….well, fingers crossed I get it done soon!
June 9, 2011 at 4:47 am
I’m making over my g’girl’s bedroom next week for her 4th birthday, and want to include a chandelier. Your project here has got me thinking! That style of bulb is fantastic… wish they had been available for my old dining room chandelier! Love your stuff… love all the photos… love the way you share!
June 9, 2011 at 5:47 am
So beautiful! I can’t wait to see the tutorial.
June 9, 2011 at 6:15 am
Wow! The chandelier looks great. I have one gathering dust in the basement. I knew it had potential, so I really appreciate all your tips about sources for updateing it. Can’t wait to try those bulbs! Thanks.
June 9, 2011 at 6:16 am
Yet another fantastic, creative upcycle! The Sylvania bulbs look great and sound great – I will definitely look for them when I replace my chandelier bulbs. Cheers!
June 9, 2011 at 6:24 am
It’s amazing what a little paint can do. It’s beautiful! Love the crystals. The bulbs are kind of funky. Not sure I know what I think of them yet.
June 9, 2011 at 6:29 am
The chandelier is gorgeous….it looks expensive! I love being able to transform old into new again.
June 9, 2011 at 6:50 am
I love the chandelier! Did you have to do anything electrical in order to use the LED bulbs?
June 9, 2011 at 6:57 am
Love this project. I have an ugly chandelier that came with our house that I’ve been wanting to throw out thinking no one would want something sooo outdated. I just haven’t replaced it yet. You’re creativity to see something special out of ordinary and/or discarded items is amazing.
June 9, 2011 at 7:01 am
It’s so beautiful!
June 9, 2011 at 7:13 am
I just love how different your chandy looks!! I myself am not a “frilly” type of decorator (not a stitch of lace nor flowers in my house), but I love to look at stuff that is!
Great job & have fun at girls camp!
June 9, 2011 at 7:27 am
Beautiful revitalization, Monica. But, wow! Those bulbs are expensive.
I guess we’ll have to spend a little to save the environment. :)
June 9, 2011 at 7:39 am
What a great turnaround! What kind of surface did the chandelier have before, and what kind of paint did you use?
Thanks for sharing!
June 9, 2011 at 7:54 am
Agreed, the light bulbs do add the finishing touches… and am I correct to assume that the middle part between the chandelier and light bulb are connected to the bulbs?
Thanks, as always, for sharing!
June 9, 2011 at 7:59 am
Beautiful chandy redo! Makes me want to try one…
June 9, 2011 at 8:45 am
Great job! I look forward to seeing how you attached the strings of glass beads to it. Have fun at camp!
June 9, 2011 at 8:45 am
Wow! It’s fantastic! So, shabby chic. I am going to keep my eye out for an old chandelier to do the same. Thanks for the inspiration!
June 9, 2011 at 8:45 am
This looks awesome. I’m buying a foreclosure that has some ugly brass fixtures in it and this just gave me a great idea to re-vamp rather than buy new ones!
June 9, 2011 at 9:03 am
I agree Kathy it is beautiful, normally I am not a fan of beads and the like. However, the fact that you painted it that soft blue helps to soften it. Looking at the one above my head which I don’t like and thinking hmmm maybe it just needs a make over. You are such an inspiration. Have fun at camp.
Peace, <
June 9, 2011 at 9:05 am
Wow, that is so beautiful…. all I can say is, WOW.
June 9, 2011 at 9:26 am
Really beautiful!
June 9, 2011 at 9:30 am
I love it! I love the look of having a beautiful chandelier, or perhaps a few in a dining room – and this is such a great way to have them affordably! I cant wait to try this!
June 9, 2011 at 10:48 am
Wow, this is amazing! Our house is very old and we have some ugly brass fixtures…I think I now have the inspiration to transform them into a beauty! Thanks for sharing, looking forward to the full tutorial!
Heidi
June 9, 2011 at 11:20 am
This is so pretty. Great job on the refashion…
June 9, 2011 at 11:59 am
That came out so stunning what a difference from before. I don’t like brass also. I can’t wait to see your reveal!
June 9, 2011 at 1:01 pm
I have a chandelier very similar to that – it’s super huge and needs to hang from a high ceiling (which I don’t have). I think I’m going to either re-wire and swag it, or put candles in place of the bulbs. I can see myself lounging on a fainting couch gazing up at my beautiful chandy. :)
June 9, 2011 at 1:12 pm
I LOVE this!! I am cataloging this with my other crafty inspirations for when I buy a home and get to decorate it! :)
June 9, 2011 at 2:13 pm
Perfect Make over – It is looking so stunning, I am sure it brightens up the room!!
June 9, 2011 at 3:47 pm
There’s hope for the outdated styles yet!
June 9, 2011 at 3:58 pm
What a fine re-do! Thanks for the motivation!
June 9, 2011 at 5:56 pm
Love, Love, Love the chandelier! How gorgeous it became with the new paint, beads and crystals! Gotta make one of my own! Thank you!!!!!
June 9, 2011 at 7:04 pm
Stunning (and I’m not just talking about the designer)! – Great job Monica, it really is an eye catcher and I love the crystal pattern with beaded trim. As always, I can’t wait to see what you come up with next!
June 9, 2011 at 7:49 pm
I love the chandeliers and the crystals but am completely enamoured by the bulbs! I’ve never seen them before and love how energy effecient they are.
Have fun at camp!
June 10, 2011 at 4:12 am
I am always amazed by people who can see the potential in a object that is so seemingly hideous. What a gorgeous transformation! Kudos!
June 10, 2011 at 1:05 pm
Well done your chandelier looks great!
June 10, 2011 at 1:22 pm
W O W! i love this version of a chandalier on a budget, absolutely stylish and classy. I can only imagine how the rest of the room came out.. Fabulous! You are one talented women. God bless you ALL!
June 10, 2011 at 8:50 pm
Love your chandelier make-over. I’m liked my chandelier in the dining room but looking at this makes me wonder if I should paint it. I definitely want to add some bling but wasn’t sure what direction to do.
June 11, 2011 at 4:21 am
I love this! I actually found an old chandelier in a giveaway box at a yard sale and have been waiting to decide what to do with it. I love what you did!
June 11, 2011 at 8:09 pm
I love it! I have the same chandelier in my dining room. I will be redoing mine soon.
June 11, 2011 at 9:13 pm
This looks amazing! All of your projects are so inspiring to me. I really want to use them to spice up my new dorm room in the coming semester! With your tips it could be a stylish place to hang out for very cheap. Great job!
June 12, 2011 at 7:21 am
That looks great!
June 12, 2011 at 7:47 am
Fun project. I’d like to try it in color.
June 12, 2011 at 4:01 pm
I love this idea! Especially because I have my very own brass (and wood) vintage chandelier that is just sitting on the floor waiting to be installed in my dining room. What a difference it would make to give it a bright coat of paint and some new LED lights, and maybe some crystals, too. Thank you for a terrific idea.
June 12, 2011 at 9:25 pm
love the beads on the chandelier!
June 13, 2011 at 7:14 am
Wow, amazing. It turned out beautifully.
June 13, 2011 at 10:49 pm
The chandy is beautiful. I can’t wait to see the rest of the room.
June 14, 2011 at 10:12 am
It turned out beautifully! I cannot wait to move into our new house and make a chandelier hopefully as beautiful as yours!! I also cannot wait to see the step by step! So excited!
Thanks for sharing!
June 14, 2011 at 8:08 pm
Ooh-la-la…Love that chandelier! Amazing transformation.
June 14, 2011 at 8:11 pm
What a beautiful project! Simple and inexpensive and make a dramatic impact! Great job.
June 15, 2011 at 6:07 pm
HUGE improvement on the chandelier…love it!
June 15, 2011 at 8:02 pm
That’s beautiful! What kind of paint did you use?
June 16, 2011 at 1:26 am
Now the chandelier complements the color of your wall. I can’t wait to see what your dining room makeover will look like. I’m pretty sure it will be great.
Also, please state how many hours did you spent DYIng this chandelier. I just would like to try this one if I have the time. Thanks in advance.
Enjoy the girls camp.
June 16, 2011 at 9:39 pm
I can’t believe that’s the same chandelier! can’t wait to see how you did it!
June 18, 2011 at 2:03 pm
Love this! I can’t wait to see how you did it so I can try it myself.
June 19, 2011 at 5:38 pm
Love this! You did an awesome job!
June 20, 2011 at 11:11 am
I have that chandelier and sadly, it is hanging in my dining room. I can’t wait for the weekend so I can give it a similar makeover! Thanks for the great ideas!
June 20, 2011 at 12:59 pm
those bulbs are adorable!
June 20, 2011 at 1:01 pm
What a lovely transformation. It shows that is pays to be patient when gathering pieces for a project!
June 20, 2011 at 3:06 pm
I love the crystals and acrylic beads!
June 20, 2011 at 10:03 pm
gorgeous, love white chandys!
June 21, 2011 at 3:47 am
Now that is impressive! The crystals add just the right amount of bling! Good job.
June 21, 2011 at 4:47 am
I love what you did with the chandelier! Definitely gives me ideas… ;-)
June 21, 2011 at 7:11 am
You just pushed me over the edge! My dark iron chandelier is getting ready to become bright silver with custom shades on the bulbs–sooner than later now that I’ve seen your swell results!
June 21, 2011 at 11:30 am
Amelia – Thanks! If your chandelier is in as poor shape as mine was, it will take a weekend to finish it. That includes rewiring, cleaning, taping, painting, hanging, stringing beads, and hanging crystals. Best of luck with your chandelier. Please send me a pic when you finish it!
June 21, 2011 at 11:34 am
wendy – Thanks! I used primer and Rust-Oleum “Heirloom White” spray paint.
June 21, 2011 at 4:59 pm
What an excellent re-use and re-vamp of something so dated and unpretty. Great job!
June 21, 2011 at 9:57 pm
We just spray-painted some outdoor brass lights black and they look so much better. You are right about brass…we were not a fan of it either. Isn’t it incredible what a little paint will do?
June 23, 2011 at 6:46 pm
Paint is such an easy way to update, but it is really the crystals that give it the glimmer. It looks expensive, and delicate, and tasteful all at once.
June 24, 2011 at 10:14 am
Absolutely lovely. I love the changes.
June 25, 2011 at 5:04 pm
Wow! It looks so different! I love your makeovers and before and afters, always have!
Congrats on the creative mind!
June 28, 2011 at 7:47 am
I have a similar chandelier and this has given me some great ideas! Watch out!
June 30, 2011 at 4:57 pm
I am actually doing the same thing with chandeliers i got for free on craigslist. But my question is about the LED lights do they come in a “very bright” version?
June 30, 2011 at 5:14 pm
drama – Not that I know of, but I’m sure the technology will get there eventually.
Putting on the Ritz, or a new dining room light | The Modern Parsonage said,
July 20, 2011 at 6:20 am
[...] I have a special project in store. See, Curbly did this great little piece on a light makeover at Craftynest (um, best site ever). Ms. Craftynest had scored a chandelier similar to ours at a salvage yard, [...]
September 25, 2011 at 11:01 am
I just found my new project!!!!
cant wait to have my own white chandelier for my bed room!!!!!
thanks for the great Idea!
October 18, 2011 at 10:18 pm
I AM a fan of your blog.This is a cool adn nice read. The blog is written in such a way that it is so easy to read and understand.
November 18, 2011 at 1:11 pm
This is BEAUTIFUL!! I am looking for one just like this and you’ve inspired me to try it myself…YIKES!! Can I just buy yours? HA!! Awesome job!!
December 10, 2011 at 8:07 pm
Wow! You did an awesome job–so pretty! I found your page while looking for a tutorial on how to do this to my chandeliers. Have you posted the tutorial yet?
January 23, 2012 at 4:15 pm
Love this. I am redoing a candle chandelier, I wish I could get electric to it, but not sure how. This one turned out really beautiful! That was an ugly light to begin with, and would have probably ended up in the trash. GOOD JOB!!! Thanks for the pin on Pinterest!
March 15, 2012 at 10:12 am
I love remade chandeliers. I did mine, too, but I love that yours is so whimsical! Looking forward to your reveal.
April 9, 2012 at 6:04 pm
Isn’t it amazing what a little work and a whole lotta bling can do? It’s a beautiful after.
Did the crystals come pre-strung, or did you end up doing the stringing and hooks yourself? Enquiring minds want to know!
Liz
April 22, 2012 at 7:30 pm
I am redoing a chandelier for my daughter’s room. I am super excited! I am trying to find beads. Loose ones seem cheaper but how did you string them?
April 23, 2012 at 6:13 am
Love the transformation of this chandelier! It’s beautiful! I just bought a “junk” chandy and am wanting to re-do it for my daughter’s bedroom. Looking forward to the tutorial!
April 28, 2012 at 8:05 pm
I found a chandelier just like yours on craigslist for a steal! I plan to give it a makeover for our wedding. I taped and painted it this weekend but I’m interested in finding out how you attached the beading. I can’t quite tell from the pictures…
April 30, 2012 at 8:25 am
what size of beads did you use? 12mm?
May 7, 2012 at 5:17 pm
I have been searching for a new fixture for my dining room.. Now I’m just going to “refresh” the old one, which is similar to the one you refurbished! Thanks for the great money saving idea!
May 10, 2012 at 2:24 am
OMG Have to say I love the way you have done the light…Would love to make one myself..Your work is very Beautiful I have to say….I love so many of your ideas…
July 4, 2012 at 7:08 am
Can’t wait to try this out – Now on the hunt for an old, dated chandelier that I can transform!!
July 17, 2012 at 8:21 am
How did you attache the acrylic bead strings to it?
July 24, 2012 at 11:17 pm
Yes, I would also love to know how you attached the beads and crystals to this beautiful chandelier. I can’t wait to try it!!! :o)
August 6, 2012 at 12:38 am
I finally posted the chandelier tutorial. You’ll find it posted here: http://www.craftynest.com/2012/08/chandelier-makeover-the-tutorial/ Sorry it took me so long!
August 30, 2012 at 10:17 pm
As soon as I can find the right candelabra chandelier to repaint this is happening in my dining room! Love it!!! Thanks for the post!
March 4, 2013 at 4:57 pm
Beautifull!!! Do you know which sylvania bulbs you used the link is not working and I want to get the same ones? thank you lisa
May 4, 2013 at 6:29 am
I love this chandelier, it is exactly what I have been looking to do to mine. I got one off Freecycle and painted it bronze but now want it for a bedroom makeover.
So I plan to paint it white and add the bling. Yours looks wonderful. THank you for all the ideas.