
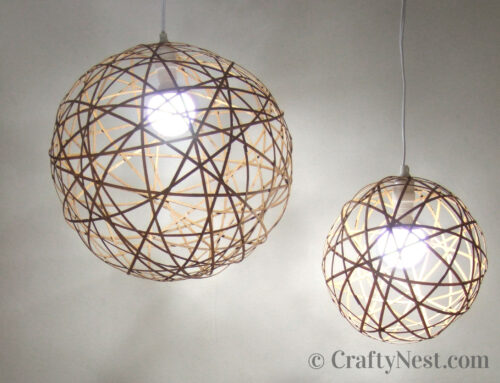
DIY coffee filter snowball wall light

Lately I’ve been working with wire and wire mesh. First I made jewelry holders, then a jingle bell ornament, and now this decorative light fixture. I call it the Snowball light because it reminds me of the giant snowballs that terrorize Scrat, the acorn-obsessed saber-toothed squirrel in the movie Ice Age. But if you look closer, the delicate ruffles of the coffee filters look like carnations. I thought it would be fun to dye the coffee filters or dip the tips in paint to mimic red-tipped carnations. In the end, I kept it simple. (This post contains affiliate links. If you use these links to buy something, I may earn a small commission. You can read my full disclosure here.)

Where did I get the idea to make this crazy thing? Back in 2012 when I originally wrote this post, I was into African Juju hats. These hats are traditionally worn by village chiefs in Cameroon. Bird feathers are hand sewn onto a raffia fiber base/basket that splays out into a huge circle. In the West, they were quickly catching on as wall decor. One of the first ones I spotted in a magazine was Serena & Lily’s Feathered African Headdress. It was way out of my price range, but I loved the look, so I thought up this economical substitution — and added lights to make fun and functional. Now African Juju hats are all over Etsy and Amazon. They come in myriad colors and sizes, and many of them are now affordable. They’re gorgeous grouped together or all by themselves.

Top row: African Home, JujuArtHouse, AfricanHomage.
Middle row: Geometrikdesign, AfricanBumbles, AfricanCreation7.
Bottom row: JujuHatVintageShop, AfricanBumbles, AfricanHomage.
My snowball light is 32 inches in diameter, took 800 coffee filters, 400 staples, 60 mini-cable ties, two people, and about 16 hours. I didn’t think it would take that many coffee filters when I planned this project. I originally bought 400 thinking I would have plenty extra. But I started out placing the coffee filters close together, so I had to finish the way I started or the light would have been lopsided.

If you think the sheer quantity of supplies I used is bad, consider the fact that I did exactly what the light-string safety instructions warns against: “Do not cover the product with cloth, paper or any material not part of the product when in use.” So, as with all of my projects, light this lamp at your own risk. Treat it like a burning candle or a lit Christmas tree: Never leave home when it’s lit. And only use LED lights. All you safety police should know that I kept my light on for several hours, and the bulbs never got warm, let alone in danger of bursting into flames. Granted, I only tried Ikea’s Glänsa lighting chain, so I cannot vouch for any other brand.
If all the above information didn’t scare you off, and you still want to make a snowball light, I recommend recruiting a buddy to help you, turn on a favorite movie, and build it assembly-line style. I’d also recommend making your snowball less dense by spacing out the coffee filters and therefore cutting your coffee-filter requirements — and time investment — in half. I hope some of you are brave enough to try it. I’d love to see what variations you come up with!
Special thanks to my friend Kristi who helped me for nine hours stuffing coffee filters, and lent me the use her apartment for the photo shoot.
How to make a coffee-filter snowball wall light
SUPPLIES & TOOLS
400+ basket-style coffee filters
stapler and 200+ staples
string of LED lights
with at least 100 lights (I used Ikea’s Glänsa lighting chain, which is no longer available)
wire cutters or tin snips
wall hook for hanging (either screw-end or removable 3M hook)
heavy-duty scissors
(or just use wire cutters)
newspaper or drop cloth (optional)
DOWNLOAD
INSTRUCTIONS

1. My circle is about 28 inches in diameter. If you want to make the same size light, download and print my circle pattern pdf. Protect your work surface from scratches with newspaper or a drop cloth. Using tin snips or wire cutters, cut a piece of hardware mesh that is 60 x 60 squares wide/tall (about 28 x 28 inches square). Follow the pattern and cut off squares in each corner to make a circular shape.
Note: I only had 24-inch wide hardware cloth on hand, so I sewed on an extra piece of mesh with 24-gauge wire. That’s why my circle has a seam in the photo above.

2. Starting at the outer edge of the circle, secure the end of the LED light string to the wire frame with a cable tie.

3. Trim off the excess cable tie with heavy-duty scissors or wire cutters. Be careful not to cut the wire or light string.

4. Continue around the outside edge of the circle, attaching the light string with a cable tie every few inches.

5. Continue attaching the light string to the mesh in a spiral pattern. Allow 2½ to 3 inches in between each concentric circle. Ideally, your light string will reach the middle as shown. If you have excess, continue circling back, attaching as you go, until you get to the end.

6. Grab your coffee filters, stapler, and staples for the next part.

7. Taking one coffee filter at a time, place your finger in the middle, then wrap the coffee filter over your finger.

8. Remove your finger, then crimp the end off the coffee filter about 1½ to 2 inches to make a flower shape.

9. Insert the tip of the coffee filter flower into an opening in the mesh, front to back. Skip a square, then insert another coffee filter flower. On the back, cross their tips and staple the two flowers together. This will keep them from slipping out of the mesh.

10. Repeat step #8 in a circular pattern. I did a row in a checkerboard pattern, then skipped a row and repeated. If you follow this pattern, you will need 800 coffee filters. I recommend spacing them out more than that. Try skipping two squares instead of one, or skip more than one row at time.

11. Continue until your entire circle is filled with coffee filters. As with cross stitch, it’s always nice to keep the back looking as clean as the front.

12. Hang your snowball light on the wall with a hook and turn on the lights. It’s super easy to hang, because you have lots of holes to choose to hang it from.

Share this story
Reader Gallery
Made this project? Email your photo(s) to monica (at) craftynest (dot) com, and I’ll share your version here!
I’m definitely going to try it after the holidays but will try to do it with Angel wings to put over the head of my bed