
DIY painted lampshade + finial

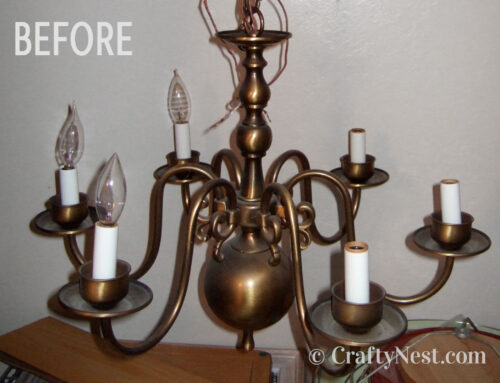
You probably remember this lamp. Its first makeover was four years ago. Frankly, the fabric-covered lamp shade was a disappointment, and brass just wasn’t my thing. I still loved the white lamp base itself, so I decided to spray paint the brass base, rewire the lamp with nickel-plated hardware, and redo the lampshade. Instead of covering the lampshade with fabric, this time I decided to try paint. And I found the perfect off-white fabric drum shade for it at Lamps Plus. (This post contains affiliate links. If you use these links to buy something, I may earn a small commission. You can read my full disclosure here.)

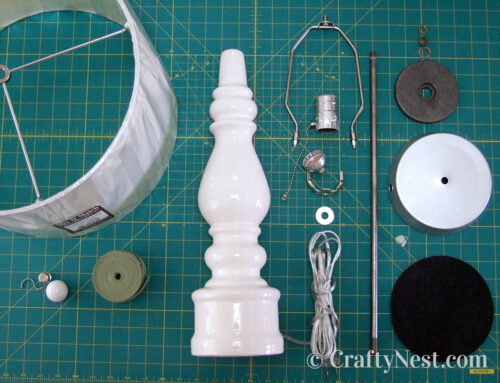
This isn’t my first time rewiring a table lamp either. Last time I used a lamp kit and didn’t go into much detail. This time I’ll show you how to assemble the individual parts, which should be of more use to you. For the instructions on how I rewired the lamp and painted the brass base, click here.

The reason for this makeover: I bought new table lamps for my living room, so this lamp was moved to the bedroom to use as a bedside light. It was a bit tall to reach the switch from bed, so I needed to replace the turn-knob with a pull-chain.

I’ll even show you how I made the ball finial. Sure, I’ve made finials before too (such as this painted one and white one), but this finial is different — and easier. No painting involved.
How to paint a lampshade
SUPPLIES
TOOLS
INSTRUCTIONS

1. Apply painter’s tape in your desired pattern. My chain pattern has 3- by 2½-inch links, spaced as evenly as possible. Use scissors to cut the tape with clean, straight edges.

2. Cover your work surface with paper or a drop cloth. Coat the entire outside of the lamp shade with paint.
Paint tips:
1. Use only flat paints when painting fabric because the sheen will leave unsightly streak marks.
2. To keep paint from bleeding under the tape, try painting a coat of clear matte medium first. I didn’t try it myself and had trouble with bleeding paint.
3. Most paint is opaque, which blocks light and makes your shade look darker when the light is on. If you want a more transparent color, try mixing your paint with clear matte medium.

3. Place the lampshade on a lamp or a tall vase to dry. When dry, remove the tape.
How to make a lampshade finial
SUPPLIES & TOOLS
drawer pull without a permanently attached screw (knobs from Anthropologie or Hobby Lobby will not work) — I bought mine at a salvage yard
nickel-plated ball chain
scissors
INSTRUCTIONS

1. Hold the drawer pull on top of the button finial and wrap the chain around the seam. With scissors, cut a length of ball chain that’s exactly the right circumference.

2. Apply a dollop of glue on the top of the button finial, then press the bottom of the knob onto the glue.

3. Gently apply a thin line of glue all the way around the seam, them wrap the ball chain over the glue. Let dry at least 24 hours before attaching it to your harp.
Tip: The glue is still wet and slippery at this point, so handle the finial gingerly until it’s dry.

Share this story
Reader Gallery
Made this project? Email your photo(s) to monica (at) craftynest (dot) com, and I’ll share your version here!
Leave A Comment