
Chandelier makeover: the tutorial

My apologies to everyone who has been waiting since last summer’s blog post for me to share this chandelier tutorial! Life got in the way and delayed my ability to pass on this information. First there was girls camp, and then I got a new job, and then I moved. I’m still waiting for my brother to help me hang the chandelier in my bedroom. Yes! In my new apartment, it’s going in my bedroom. Meanwhile, the chandelier sits on the floor in the corner. I gave up waiting for my brother and slung it over the bar in my closet to take some photos for you. (This post contains affiliate links. If you use these links to buy something, I may earn a small commission. You can read my full disclosure here.)

And then the hooks I used were so old that I couldn’t remember where I purchased them. I searched Michael’s, Joann, and every online bead store that I knew of and came up empty. Nobody seems to sell the exact hook-and-eye that I used. I finally found some that are close enough at Fire Mountain Gems, to which I linked in the supplies list. I sincerely hope they work for you.
As I mentioned before, I found this old chandelier years ago for $20 at a salvage yard. I cleaned it up, and my brother rewired it. I’ve never been a fan of brass, so it got a fresh coat of paint. And I added some bling: beads I bought on eBay and crystals I accumulated from Craigslist and Freecycle.
How to make over an ordinary chandelier with paint, beads, and crystals
SUPPLIES
Amounts are based on a 6-arm chandelier.
spray primer
spray paint (I used Rust-Oleum “Heirloom White”)
blue painter’s tape
- small paper bag (optional)
chandelier crystals with connecting pins (I used 24 100mm U-drop prisms, 12 60mm glass pendalogues, and 1 55mm pear-shaped faceted crystal)
300 beads (I used 12mm crystal clear faceted acrylic)
1 small washer or nut
hook-and-eye clasps (I used 13x6mm hooks, which don’t seem to be available anymore). Try one of these:
TOOLS
INSTRUCTIONS

1. Clean the chandelier of dust. Cover the cord, chain, and candle covers with blue painters tape. If your canopy is attached, cover it with a paper bag and tape it closed.

2. Spray one coat of primer on the entire chandelier, following the directions on the can. Hanging your chandelier inside a spray-painting tent is the easiest way to paint a chandelier. If you don’t have one, use a drop cloth or newspaper. Let the primer dry, then spray two coats of spray paint. Let dry. Remove the tape and paper bag.

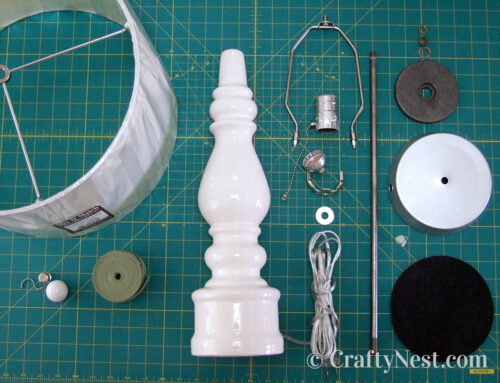
3. Gather your beading supplies. (The hook-and-eyes and crystals are not in this photo. See photos below.)

4. There are three beaded strand lengths for each arm: one long for connecting the top of the chandelier to the arm, one medium from which to hang crystals, and one short to drape between the arms. Your lengths will vary based on the size of your chandelier. The lengths of mine are: long = 11.5 inches (21 beads), medium = 9.5 inches (17 beads), short = 7 inches (12 beads).

5. Start by cutting your hooks. (You can set aside the eyes. You don’t need them for this project.) Use wire cutters to cut the tip of the hook off at the point where it starts to curve in the opposite direction. And if your hooks look like B (like mine did), use pliers to twist the loop to be perpendicular to the hook, as A and C already are.

6. Cut a piece of beading wire several inches longer than the strand you are planning to string. For example, if you are starting with a short strand, cut a piece of wire about a foot long.
7. (Sorry I don’t have photos of these two steps, but if you’ve ever made jewelry, you know what to do already.) Feed the wire through a crimp bead, then through the small loop on the hook, then back through the crimp bead. Stop pulling an inch or two past the crimp bead. Hold the wire in place and slide the crimp bead as close as you can to the hook. Use crimp pliers or needle-nosed pliers to crimp the bead tightly in place.
8. Slide your beads onto the wire. Make sure the short end of the wire is tucked inside the beads. When you get to the end, repeat step 7, then trim the wire and tuck it inside the last couple beads. It helps to string the wire back through a couple beads before crimping and trimming.
9. After you’ve strung all your strands, attach your crystals to the medium length strands. I spaced my prisms between the beads in these increments: 3 – 4 – 3 – 4 – 3.

10. String a short and medium strand between each arm by attaching your hooks to the rolled edge of your chandelier’s candle cups.

11. Attach one hook on each of your long strands to the top cup and the other hook to one of the candle cups.

Here’s a close-up of all three strands connected to a candle cup.

12. Cut a piece of 22-gauge wire several inches long. Hang a crystal from the piece of wire, then wind both ends of the wire around the arm of the chandelier a few times. Trim if necessary.

13. Repeat the same process as step 12 to attach a crystal to the decorative hooks underneath each arm.

14. To attach the crystal to the base of the chandelier, unscrew the nipple-looking piece of the chandelier body. Drill a tiny hole through the tip of the nipple. Cut a piece of 22-gauge wire about a foot long. Wrap one end of the wire around a small washer or nut a few times. Place the nut inside the nipple, thread the other end of the wire through the hole in the nipple, then attach the wire to the crystal. Trim the excess wire. And screw the nipple back onto the base of the chandelier.
15. Screw in your LED light bulbs, and hang your chandelier with the help of an electrician. To determine how high to hang your chandelier above a dining table, follow this general rule: The bottom of the chandelier should hang 30 – 34 inches above the tabletop, assuming you have an 8-foot ceiling. For each foot of additional ceiling height, add 3 inches to the suspension height.

Share this story
Reader Gallery
Made this project? Email your photo(s) to monica (at) craftynest (dot) com, and I’ll share your version here!

Hello,
Can you tell me where you purchased your round 12mm crystal clear faceted acrylic beads for your chandelier. I have looked everywhere and can’t locate them.
Thank you
Kareen – I bought them on eBay. There are still lots listed if you search for “12 mm crystal clear faceted acrylic beads.” I just checked to make sure. Let me know how it goes!