
DIY Lazy Susan = two wooden clocks

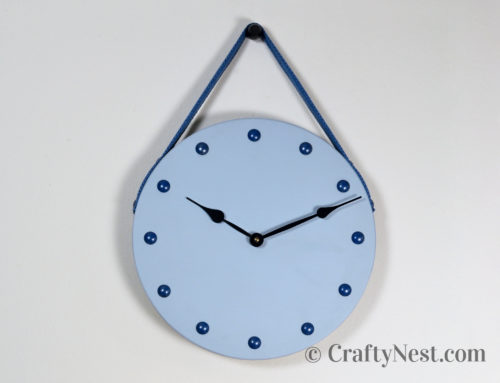
I wanted a big, bold clock to make a statement on my wall, but I couldn’t find anything like what I imagined, so I made my own. I started with a $7 Snudda Lazy Susan from Ikea (now $13). And — surprise — I got two clocks from one Lazy Susan. The red one is made from the top. It’s 15 inches in diameter. The blue one is made from the base. It’s 7 inches in diameter.


My first DIY projects appeared in Sunset magazine’s now defunct blog, Home By Sunset. This post is an updated version of “Big Red & Baby Blue clocks,” originally published September 7, 2007.
How to make two clocks from one Lazy Susan
SUPPLIES
TOOLS
INSTRUCTIONS FOR THE BIG CLOCK


1. Choose your design for the big clock face. The fun part about this project is that the possibilities are endless. You can use paint, decoupage, stencils — the list goes on and on. I chose to use wooden shapes that I found at Michael’s. After I tried out several patterns on the clock face, I chose this flower design. I also like this circle pattern.
2. Lightly sand the top and sides of the Lazy Susan. Sand the rough edges off the wood shapes. Remove the dust with a tack cloth. Paint a primer coat on the surface of the Lazy Susan and all the small wood pieces. After it all dries, apply 2-3 coats of paint. Some of the small pieces require a light sanding along the edge in between coats. It’s a cinch to paint the sides of the Lazy Susan just by rotating it around. Let the paint dry overnight before disassembling the Lazy Susan.

3. Flip the Lazy Susan over and use pliers to unscrew the nut. Then pull the base straight up and off. Remove the four screws holding the turning mechanism. Using a ruler, draw an X by connecting the screw holes. Then drill a hole through the middle of the X with a 5/16-inch drill bit.
4. Apply a thin coat of wood glue to the back of each wooden shape using a toothpick and lightly press it down on the face of the clock. For the flowers, glue the centers down first to provide an anchor for placing the petals.

5. Assemble the quart movements according to the instructions. The movements come with a heavy-duty hanger, so all you need to do is add a AA battery, set the clock, and hang it.
INSTRUCTIONS FOR THE SMALL CLOCK

1. Remove the gasket from the wooden base. Drill all the way through the existing small hole in the center with a 5/16-inch drill bit.

2. Decide on the design for the small clock. I went with simple wooden circles for each number.

3. Follow the same steps above for painting all the pieces. If you want to paint the sides a different color, use a small paintbrush and paint from the center outward to get a clean line at the edge where the two colors meet.
4. Glue on the dots after the paint dries. Follow the instructions found here to easily place each dot every 30 degrees around the circle.
5. Assemble the movement according to the instructions above, and hang your clock.

Share this story
Reader Gallery
Made this project? Email your photo(s) to monica (at) craftynest (dot) com, and I’ll share your version here!
Leave A Comment