
DIY advent calendar with tins & handmade ornaments

I know, I’m late. An advent calendar on December 9? This project took way longer than I anticipated. Just drawing my designs by hand and editing them on the computer took weeks. I probably should start Christmas crafts in June next year. But I’m glad I stuck with it. My husband and I love how it turned out. (This post contains affiliate links. If you use these links to buy something, I may earn a small commission. You can read my full disclosure here.)

Anyway, my very first Crafty Nest project back in 2008 was this spice rack. It turned out to not be such a great idea to store spices in seamless tins. When I was deciding how to repurpose the spice rack, I noticed that there were a total of 25 tins — the perfect number for an advent calendar. The tins are also the perfect size in which to stow three pieces of candy (one for each of my step children) and a small ornament.

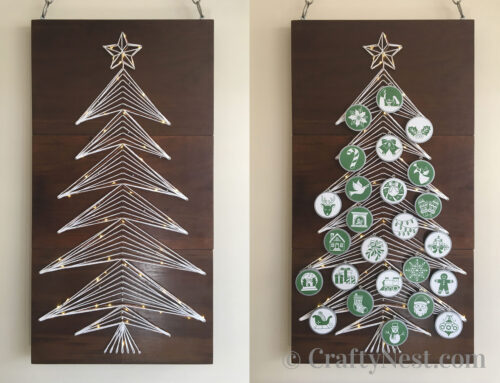
I hunted and hunted for 25 ornaments that 1) I liked, 2) coordinated with one another, and 3) fit inside the tins. I came up empty. So I made my own. Then I pondered if the ornaments should hang on our Christmas tree or something made specifically for them. I’d been wanting to try string art for a few years, so I made a string art Christmas tree on which to hang the ornaments.

Even though I designed the tins/ornaments and string-art Christmas tree to go together, I’m posting them separately because they don’t have to go together. You can make one or the other. Or just make the ornaments, for that matter. Click here for the string-art Christmas tree with lights tutorial and free pattern.
How to make an advent calendar with seamless tins and handmade ornaments
SUPPLIES
TOOLS
INSTRUCTIONS

1. For instructions on how to make the shelves for the seamless tins, click here.

2. Cut a two-inch dowel in ¼-inch slices with a miter saw. You’ll need 25 of them, but cut a few extra in case you make any cutting, sanding, or painting mistakes.
Note: I used a dowel I had on hand, which was about 2¼ inches in diameter. My printed designs are 2 inches wide. My ornaments, therefore, have a border around the outside. Yours will not have a border because the designs are the same diameter as your dowel. If you want a border, you will need to shrink down your designs before printing them.

3. Sand the dowel slices by adhering duct tape face up on your work bench. Use 220-grit sanding discs in your palm sander, and keep your sander as level as possible. Check frequently to see if your sanding is uneven. You want your disc to remain relatively the same width all the way around. Wipe off the dust before flipping the disc to the other side and adhering it to the duct tape. Adhere new duct tape when it loses its stickiness. Skip to step 7 if you want to leave them unpainted.

4. Paint a coat of primer on the outside edges of each wooden disc. Hold the disc between your thumb and forefinger. It’s OK if you don’t paint the middle. It will be covered with decoupage anyway. Let dry. Flip over and paint the back (including the center).

5. Sand lightly with a fine-grit sanding block to smooth out the rough spots that the primer may have created. Repeat step 3 to apply the second coat to all sides. Let dry.

6. Paint 2-3 coats of craft paint on all sides. Again, the middle of one side can be left unpainted because it will be covered up anyway. The picture is of the first coat, which shows a lot of streaks. Let dry. I painted them silver to coordinate with the silver seamless tins, but you can paint them any color you want.

7. I drew each ornament by hand, scanned the drawings, and edited them on my computer. But you don’t have to do that. You can buy and download these designs from Etsy (coming next year). They’ll be available in other colors too. (I know. I’ve always given away my designs for free, but these took me a long time to make, and I’ve had problems with other sites linking directly to my downloads — so people don’t even visit my site to get my free stuff!) After you download the designs, print them on cardstock with a laser printer. You can’t decoupage ink-jet prints. The ink bleeds.

8. Cut out each ornament with scissors. If you happen to have a 2-inch round punch, that will save you time, but I didn’t have one. The best way to cut the numbered tin wraps is with a craft knife, straight edge, and self-healing mat. Cut off the white ends with one cut before cutting each wrap.

9. To attach a numbered wrap to each tin, stick a small piece of permanent double-sided tape to the middle and both ends of the back of each strip. Wrap the strip around the can. The two ends will overlap in the back. Press down firmly on the spots where the tape is.

10. Lay a round ornament design face down on a paper towel. Apply glue to the entire back side of each printed ornament design. Adhere it to a painted wooden disc with the eye hook at the top. Repeat for all 25 ornaments. Let dry.

11. Paint a generous top coat of glue over the entire front of the ornament. Repeat for all 25 ornaments. Let dry.

12. Lightly clamp each ornament in a bench vise. Protect your paint job from teeth marks by lining the vise jaws with pieces of paper. Using a rotary tool and a 1/32-inch drill bit, pre-drill a hole for each eye hook.

13. Twist each eye hook in by hand so that the hole through the loop ends up front-to-back, not side-to-side.
14. Fill each tin with candy and one of the ornaments. I put the nativity ornament in the last tin, symbolizing the birth of Christ.

15. Open a tin and hang one ornament on your string-art Christmas tree (and eat the candy!) every day in December until Christmas day. Merry Christmas, everyone!

Share this story
Reader Gallery
Made this project? Email your photo(s) to monica (at) craftynest (dot) com, and I’ll share your version here!


Leave A Comment