
DIY studded tile mirror

I have a history with tile mirrors. The house in which I grew up had a rustic fireplace with 1970s tile mirrors glued to the wall above it. Painted in the center of the grouping of mirrors was a tall ship. It had a face. I swear I could see eyes and a mouth peering out at me through the sails of that ship. As a child, I was afraid of it. You wouldn’t catch me alone in that room at night.

My mother found a photo of the mantel with the tile mirrors. I know, almost everything about this image is hideous and tacky. Have you ever seen anything like it that mirror collage? Do you see the face in the sails?
This photo was taken at Christmas. My mother designed and made those unique Christmas stockings herself. Mine is the pink one with the ruffles. I’m not sure why the other stockings she made aren’t in this picture. Anyway, I’m going to make one using my mom’s pattern and post a tutorial.
Yes, that’s a bowling pin sitting on the wood pile. A family friend worked for Brunswick. He gave us old, cracked bowling pins to use as firewood. They burned nicely.

As a preteen, I learned how to etch glass. I bought boxes of mirror tiles and used etching cream to transfer my designs onto each mirror. I etched everything from roses (for my mom) and 1934 Fords (for my dad) to the Statue of Liberty (for me).
My older brother, Aaron, was taking woodshop at school, so he built square frames for them. Together, we gave them as gifts to family members. I still have a stack of etched mirrors that never got framed.
I also made Christmas etchings. My mother framed them in fabric frames. We gave them as gifts to my grandmother and great grandmother one year. When my grandmother past away, they were given back to me (see above). If anyone is interested in learning how my mom made those frames, I’d be happy to post a tutorial.
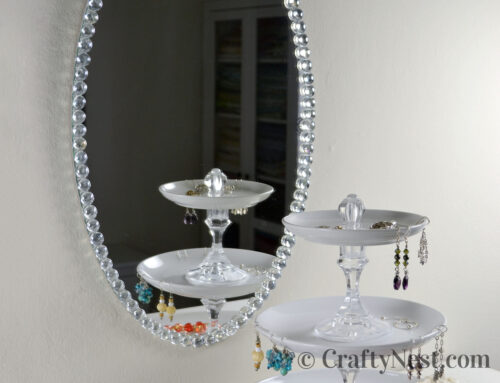
So, when I bought 12-inch mirror tiles for this project, I was having déjà vu. Thankfully, though, this project is both classier and easier than my former experiences with mirrored tiles. This is the second of five tutorials from the SYLVANIA blogger makeover challenge. The glass “studs” are meant to echo the rivets on my sheet metal magnet board. And I specifically designed the mirror to hang in front of — and hide — a power cord. Thanks again, Troy, for building it for me.

This idea was inspired by a lovely round mirror I spotted on SFGirlByBay.com a couple years ago (see above). Isn’t it gorgeous? By the way, I tried clear glass gems on an oval mirror too. It looked fabulous! Have fun adding bling to any mirror in your house.
How to make a studded tile mirror
SUPPLIES
12-inch mirror tiles
Liquid Nails mirror adhesive
one 2- x 2-foot sheet of plywood (I used a scrap piece from the magnet board project)
1×2 lumber: 2 pieces, 24 inches long each, plus a scrap piece about a foot long
3/4-inch brad nails (optional; for nail gun)
wood glue
2 D-ring picture hangers
silver spray paint
½-inch clear glass mini-gems (available at Joann)
E-6000 craft adhesive (UPDATE: Loctite Super Glue
or Loctite Glass Glue work better)
2 nails or screws for hanging
alcohol
TOOLS
INSTRUCTIONS

1. Glue and nail the two 1x2s to each side of the plywood. These add strength and rigidity for hanging. Then place the entire frame on top off a drop cloth, and spray paint the outer sides silver. Let dry.
Note: We left the top and bottom open to allow space for the power cord from a light fixture to run behind. If you prefer, you may also add top and bottom pieces.

2. Flip the plywood frame over. Apply mirror adhesive with a caulk gun.

3. Place a scrap piece of wood underneath in the center to provide support while assembling. Lay the mirror tiles on top of the adhesive, abutting each other.

4. Lay some heavy books on top of the mirrors for at least half an hour. (Harry Potter comes in handy again!)

5. Arrange glass gems on the mirrors. We placed six gems on each side of each mirror tile. Apply Loctite Super Glue or Loctite Glass Glue to the back of each glass gem and press onto the mirror. Let the glue cure for at least a couple hours before hanging.
Tip: Wipe off the mirror and the back of the glass gems with alcohol before applying the glue. It will clean off any oil or residue so the gems stick better.

6. Pre-drill holes in the back of the 1x2s and screw a hanger on each side. Measure, mark, and hammer two nails into the wall for hanging. Use a level. Hang the mirror on the nails. You’re finished!

Share this story
Reader Gallery
Made this project? Email your photo(s) to monica (at) craftynest (dot) com, and I’ll share your version here!
Leave A Comment